
How to take good photos on Poshmark: 8 tips
.png)
A blurry cover photo or one with a cluttered background is often why no one clicks your Poshmark listing. Photos do much of the selling, so you’ll need to publish great, eye-catching images that entice buyers to shop your closet.
I’ve helped sellers list Poshmark items for years, and have compiled an 8-step system that outlines how to take good photos for Poshmark. By the end, you'll know exactly how to shoot, angle, and edit your listings so buyers trust what they see.
How to take good photos on Poshmark: My 8 steps at a glance
→ Step 1: Prepare the item before photographing it
→ Step 2: Set up a clean background
→ Step 3: Always use good lighting
→ Step 4: Choose how you'll display the item
→ Step 5: Photograph multiple angles, details, labels, and flaws
→ Step 6: Edit photos without misrepresenting the item
→ Step 7: Pick a strong cover photo
→ Step 8: Check photos before publishing
Step 1: Prepare the item before photographing it
Good Poshmark photos start with preparing the item before you take pictures. Poshmark recommends getting items photo-ready, checking their condition, and documenting details or flaws that buyers should know about.
- Inspect for flaws: Check the item for stains, rips, discoloration, wear, or damage. Poshmark recommends noting condition issues and including photos of visible flaws or signs of wear. Undisclosed damage can also qualify a purchase for a return under Posh Protect, so photograph relevant flaws and describe them accurately.
- Clean the item: If possible, run the item through a washing machine. If you can’t, remove visible dust, dirt, hair, and other debris that could appear in your photos. Check the item from different angles and clean appropriate surfaces or materials before shooting.
- Remove wrinkles: Before taking photos, iron or lightly steam your items to remove wrinkles. Then, hang each item or lay it flat for the shoot.
- Arrange the item: Position your item so buyers can clearly see its shape and important features in the photos. Fasten buttons, zippers, or other closures when appropriate, and choose a flat lay, hanger, mannequin, or modeled presentation that shows the item clearly.
Step 2: Set up a clean background
A clean Poshmark background is a simple, uncluttered surface that keeps the item easy to see. Use neutral backgrounds such as a white wall, plain fabric, or a simple tabletop. Keep unrelated objects out of the frame. A contrasting surface can also help define the item clearly, such as placing a dark sweater against a light background.
Or, you can use a background removal tool so your products stand out.
Whether you use no background or a set one, always keep the setup consistent across listings when possible. This helps your closet look professional.
Step 3: Always use good lighting
Good lighting helps buyers see an item’s color, texture, condition, and details clearly. Here’s how to get it right:
Use natural light when possible
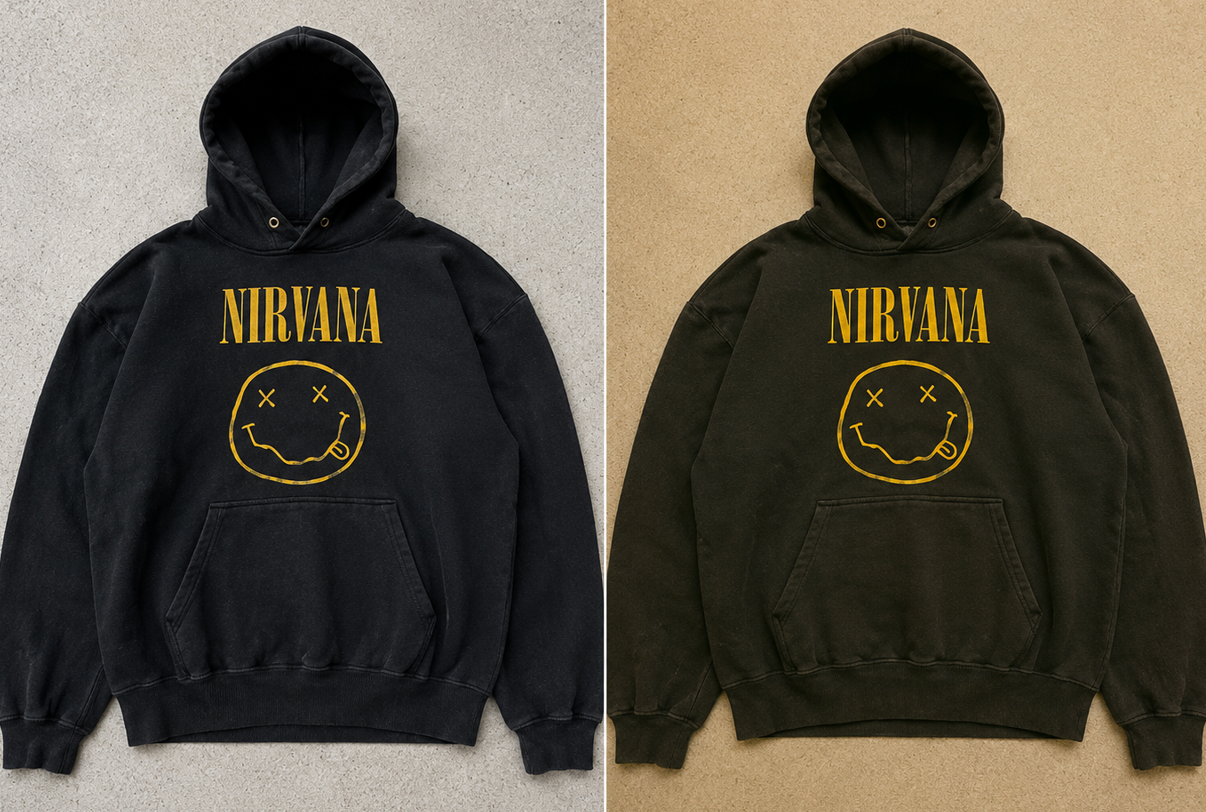
Natural light can help show an item’s true color and details without introducing the warm color cast common with some household bulbs. Set up a photography station near a window and avoid using the flash. Be aware of heavy shadows, which can alter your item’s appearance.
Position the item where the light falls evenly across it. Avoid harsh direct sunlight that creates strong shadows or overexposed areas.
Here’s a comparison photo of an item that uses natural light (on the left) and one that uses artificial light poorly (on the right):
Add artificial lighting when needed
If you’re photographing during non-daylight hours, consider artificial lighting. Poshmark suggests artificial lighting such as ring lights or box lights if you have limited natural light.
Position the light so the entire item remains clearly visible without dark shadows or overly bright areas. A consistent lighting setup can simplify photographing multiple listings.
Check your color accuracy
Check to make sure each photo accurately captures your item’s colors by comparing it to the item. Review your photos before posting and compare them with the item under neutral lighting. This process is especially important when you’re just beginning.
Once you have a routine, you won’t need to spend much time reviewing each photo. If needed, make small exposure or color adjustments, but avoid edits that misrepresent the item.
Note: If you still can’t get the color or lighting right, don’t fear. We’ll discuss how you can clean up photos with photo-editing software in Step 6.
Step 4: Choose how you'll display the item
The display method affects how clearly buyers can see an item’s overall shape, construction, and details. Here’s a look at some popular display methods:
- Hanger: Display your items suspended from a hanger vertically, so buyers can see their overall shape and length. It works well for shirts, jackets, dresses, pants, and other garments that hang naturally.
- Flat lay: Place your item on a flat surface and photograph it from above. Use a plain or contrasting surface so the item remains easy to see. This method works particularly well for clothing and accessories that can be arranged without obscuring important details.
- Mannequin or dress form: A mannequin or dress form gives garments a three-dimensional shape without requiring someone to wear them. These can be useful for showing how structured or fitted garments sit on a body-shaped form.
- Model: A modeled photo shows someone wearing your item. It helps buyers see how a garment fits, drapes, and looks from different angles. You can take several photos to give buyers a better view. Some editing tools also use AI to create virtual models, which can save time when you don’t have someone available to model the item.
- Surface display: A surface display places items such as shoes, bags, jewelry, or accessories on a stable, uncluttered background. Use a plain or contrasting surface and photograph the item from additional angles or close up when buyers need to see details such as texture, construction, or wear.
Step 5: Photograph multiple angles, details, labels, and flaws
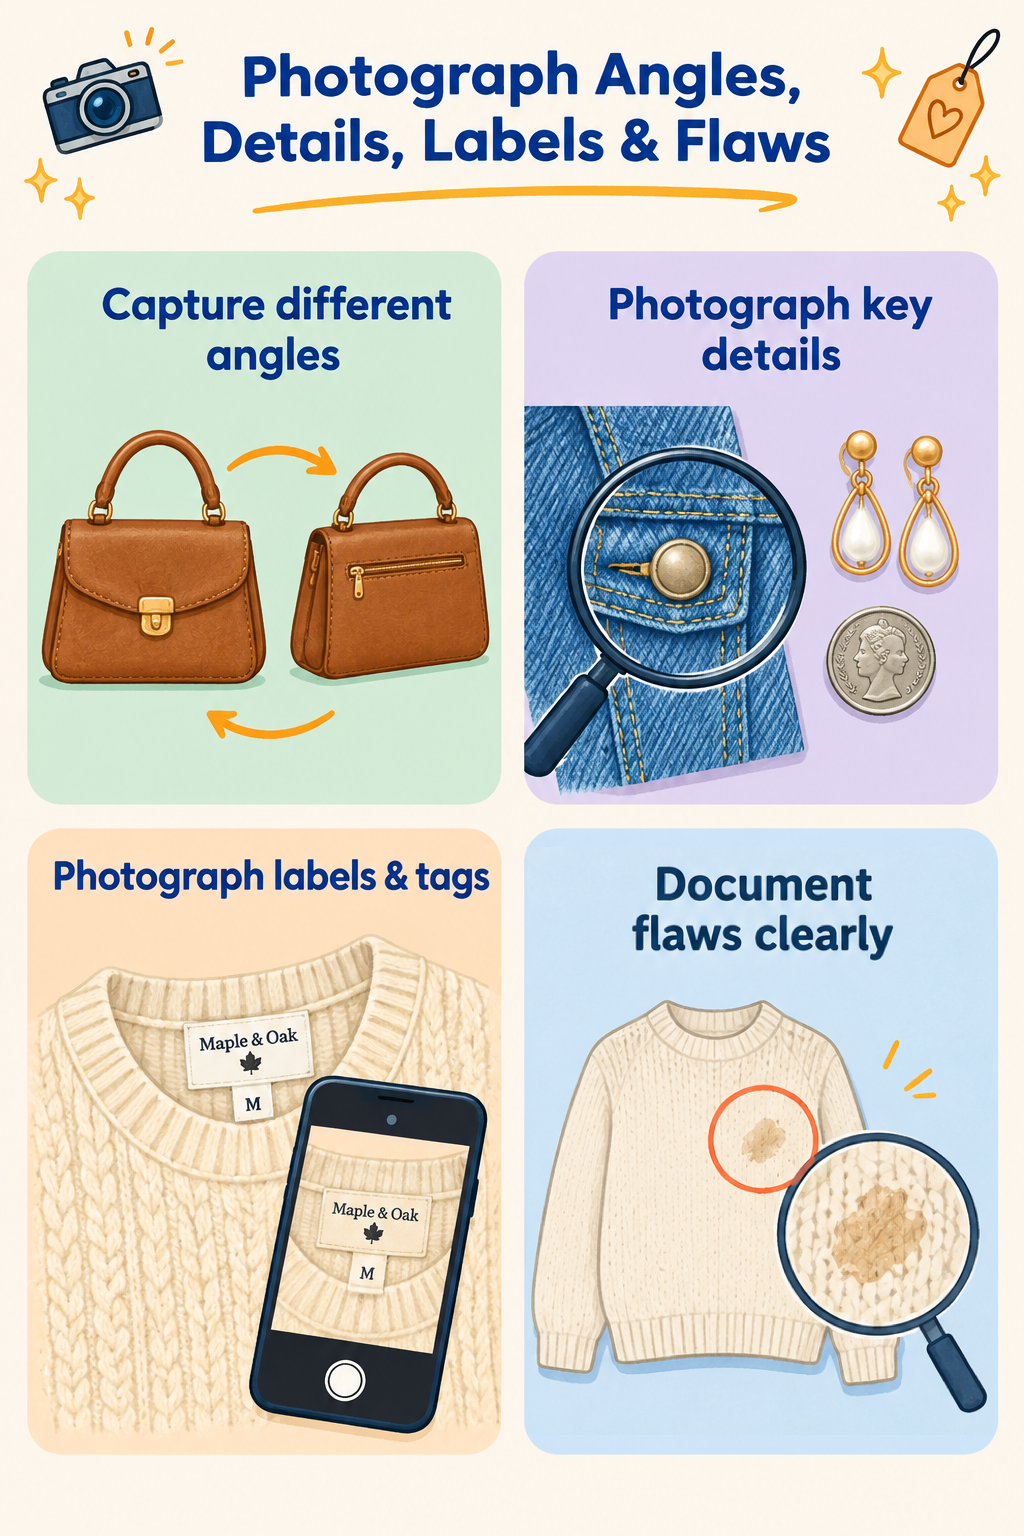
Every Poshmark listing should include enough photos to show the item clearly from different angles and document details buyers can’t see in the cover photo. Poshmark gives you 16 photo slots, so only use the best ones that give buyers the clearest possible view of each item. Keep these points in mind:
Capture multiple angles
Multiple angles show different sides of the item, including areas that may not appear in the cover photo. Shoot each item from the front, back, and other useful angles so buyers can better understand what they’re being offered.
Shoot additional views based on the item itself. For example, a handbag may need photos of the exterior, interior, bottom, and hardware. A scarf may require fewer angles, but more close-ups so buyers can get a better idea of wear, fraying, and stitching quality.
Photograph important details
Important details can include texture, stitching, hardware, closures, patterns, and other features that are difficult to see in a full-item photo. Mix full shots with close-ups of key features and texture so buyers get a clearer sense of the item’s construction and condition.
You can also photograph the item beside another object for scale when its dimensions are difficult to judge from the photo alone. For example, pair earrings with coins so buyers can get a sense of size.
Photograph labels and identifying information
Labels can provide useful information about an item’s brand, size, materials, and care instructions. Take a clear photo of the item’s tag so buyers can reference sizing and other available information like care requirements.
Shoot relevant tags closely enough for the printed information to remain legible. For example, a clothing listing can include separate close-ups of the brand tag, size tag, and fabric or care label.
Document flaws clearly
If your item has visible stains, rips, scratches, discoloration, wear, or other condition issues, buyers should know about them. Include pictures of any imperfections and note these in the item description. Use a close-up to show the flaw clearly and, when useful, include a wider photo showing its location on the item.
Documenting flaws helps build buyer trust, which is important for success on Poshmark.
Step 6: Edit photos without misrepresenting the item
Quality photo editing software can improve your images, but avoid editing them so much that they give buyers an inaccurate view of the item. Let’s look at how to edit photos:
- Crop excess space: Snip away empty background so the item fills more of the frame. Wasted space forces buyers to zoom in on details that should already be clear.
- Straighten the image: Crooked images look careless and distract from the product itself. Straightening tools keep crooked photos from distracting buyers or making them feel like they’re looking at the product while it’s in the middle of a spin cycle.
- Correct the exposure: Adjust a photo that's too dark or too bright so you can reveal its details. Poor exposure hides texture, stitching, or damage buyers need to see. For instance, you can brighten a dim indoor shot until fabric grain and color become visible again.
- Match the real color: You can make minor color adjustments when a photo does not accurately represent the item. Adjust settings such as white balance or color temperature only as needed to improve accuracy. Avoid edits that make the item look noticeably different from its actual color.
- Avoid misleading edits: Changes that hide flaws or alter the item’s real appearance can mislead buyers and lead to returns, complaints, or account penalties. If your editing software has annotation tools, use them to point out flaws or highlight useful features, such as original tags, special stitching, pockets, or unique design details.
Step 7: Pick a strong cover photo
A cover photo is the first, and arguably most important, image in a Poshmark listing. It’s the image shoppers see while browsing, and they’re often comparing it to similar listings.
Shoot a centered item, keeping the background clean. Make sure important parts aren’t cropped or obscured. Cover photos now display in a 3:4 portrait format, so frame the item with a small amount of space around the edges.
Step 8: Check photos before publishing
Check each item by reviewing the full photo set for blur, inaccurate color, missing views, and details that are difficult to read. Double-check to make sure you have a shot of tags, features, and flaws. Confirm that you have enough angles so buyers can see nearly every aspect of your item.
Before publishing, also review the cover photo as it appears in Poshmark’s current 3:4 portrait format. Center the item, make sure important areas are not cropped or obscured, and leave a small amount of space around the edges. If a photo is blurry, misleading, or missing an important detail, retake it.
Make more Poshmark sales with Nifty
Learning how to take good photos on Poshmark requires heaps of practice, from getting the lighting right to knowing which subtle edits can turn an average photo into an image that would captivate Caravaggio. But if you need photo-editing software that’s also a tool that helps you list on multiple marketplaces, go with Nifty.
Here’s why over 10,000 sellers trust Nifty:
- Built-in photo editing: Crop, rotate, adjust brightness and contrast, or use AI Studio to remove backgrounds, create flat lays, add natural shadows, or show apparel on virtual models without leaving Nifty.
- Customized AI listing: Snap a pic and let Nifty's AI build a high-quality listing, with SEO-optimized titles and descriptions, and trending hashtags already filled out for you. You can even customize how AI writes your listings to follow your unique style.
- Crosslist now: With a couple of clicks, post your items across Whatnot, Poshmark, eBay, Mercari, Depop, and Etsy. No copy-paste clutter and no multi-tab hopscotch. (More marketplaces coming soon!)
- Bulk crosslisting: Publish up to 25 listings at once with marketplace-specific pricing rules, shipping presets, and AI-enhanced titles and descriptions. Start in Nifty or import from eBay, then export everywhere in one action, so the photos you spent time perfecting show up correctly on every platform, not just Poshmark.
- Marketplace-specific Pricing Rules: Save pricing templates for each marketplace and apply them automatically during bulk crosslisting to keep listings consistent without manual edits.
- Automatic delisting? Handled: When you make a sale, Nifty's sales detection auto-delists that item from every marketplace. Say goodbye to double-selling disasters and "sorry, it's already gone" apology messages.
- Bulk tools = no busywork: Share and relist daily in just a few clicks. You can even schedule drafts to go live while you sleep and set automatic discounts that run deeper over time.
- Analytics and profits are real: Track sales, fees, top performers, and slow movers in one clean dashboard, so you can actually see what's working and what's just dead space. You can also set and track seller goals directly from your home screen.
And if you're in the UK or Australia, Nifty is available for eBay, Depop, Etsy, and Whatnot.
Nifty pays for itself in just a few weeks. Start with a 7-day free trial and see how Nifty helps you edit the photos you just took and list them across your connected marketplaces with little manual work.
FAQs
1. What size should Poshmark photos be?
Poshmark currently uses a 3:4 portrait format for listing photos. For cover photos, center the item and leave some space around the edges so important details are not cropped in the listing feed. Use clear, high-quality images that show the item and its condition accurately.
2. How do you take good Poshmark photos on an iPhone?
Take good Poshmark photos on an iPhone by cleaning the rear lens, using strong natural light, tapping to focus and check exposure, and moving closer instead of using digital zoom. Sharper photos cut buyer questions and reduce return requests.
3. How many photos should you include on Poshmark?
Poshmark allows up to 16 photos per listing. But only use as many as needed to show every angle, label, measurement, and flaw clearly. Repetitive shots don't help. Thorough, non-redundant photos reduce buyer questions and lower return rates.
4. When should you resize photos on Poshmark?
You should resize photos on Poshmark only if an image is smaller than ~800px on the short side or won't upload. Aim for 1200 x 1600px for a 3:4 portrait cover or 1200 x 1200 px for square. Crop to keep the full item visible, avoid heavy compression, and use your phone's built-in editor instead of stretching it.


.png)
.png)
.png)